I have a few blog posts that get a little bit of attention, however most only get the occasional view. I don’t pop in and monitor the activity much. I haven’t added a post in quite some time.
But recently, I noticed that I had received a message a couple of months back from a woman who had a similar bike, and it wasn’t being used. She wanted to pass the bike on to someone who would appreciate and care for the bike, as it deserved.
On occassion, I’ll receive a comment to a blog post, and I’ll respond, but there’s no continued communication with the individual. Due to my delayed response to the initial email, I wasn’t really expecting any continued dialog.
Although it had been a couple of months since her initial inquiry, the woman promptly responded to my reply and to my surprise - the correspondence began to flow.
The bike had belonged to a friend, John Aeby. Sadly, John had passed away while participating in a Bike Across Oregon event in 2009. The bike had not been ridden since. The gentleman’s widow gifted the bike to the woman who had then reached out to me. She had been the caretaker for the bike with no real use for it. Her wish was that the bike be given the proper care and respect that it deserved, and that it be appreciated once again.
I started to get excited about the opportunity to be once again work on an Expedition. I contacted a bike shop near her location in Cottage Grove, Oregon. Rainy Peak Bicycles. I spoke with Chris. I explained the situation, and asked if he would be willing to pack the bike up and ship it to me. We agreed on a reasonable cost, and with that, the wheels were in motion. The bike was delivered to the shop, and Chris did a fantastic job packing the bike. After coordinating shipping, the bike was promptly delivered to me via UPS / Bikeflights. The bike arrived in great condition thanks to Chris’ attention to detail and care.


And with that, the new (to me) bike journey begins.
We should start with John. John Aeby was an avid cyclist who passed away suddenly and unexpectedly in 2009 while participating in a “Bike Across Oregon” event. John, a young 59 years old, was a devoted family man, and a "Man of God." This is a link to John’s obituary, along with a few short articles about what transpired.
John O. Aeby
Oregon Live Link
Bike Portland link
Oregon Live Link #2
As I mentioned, I restored a similar 1983 Specialized Expedition in 2015, and researched what I could find at that time and posted in this blog (link here). I wasn’t expecting to dig up much in the way of new information while cleaning up this bike. But, I have uncovered a few new things, and they are shared here.
There seems to be a little bit of controversy or confusion over the details of who designed the Expedition for Mike Sinyard and the Specialized bike brand. It seems that initially, Tim Neenan (of Lighthouse Cycles) was responsible for the Expedition and production details with folks in Japan, but at some point, Jim Merz stepped in and finished things up for Mike Sinyard / Specialized. I stumbled upon a forum webpage where Jim Merz tries to clear up the details about each of the bike models that Specialized was working to get produced in Japan in the early 1980s. Jim states clearly that the Expedition was based entirely on his own design of a touring bike. Jim was a respected frame builder located in Portland Oregon at the time. You can read about his involvement, in his own words, here (link). I have copied and pasted his entire forum response later in this blog.
Here’s where some of the controversy stems: Tim Neenan of Lighthouse cycles Mountain Bike Hall of Fame link where there is mention of the Expedition.
A little background to Jim Merz:
Adventure Cycling Article
Jim Merz & Virginia bike tour Portland to Panama 1976
While unpacking and giving the bike it’s initial assessment, I didn’t give much thought to the nondescript decal located at the base of the seat tube, indicating the bike shop where this particular bike started it’s American journey.

But once I sat down at the computer to begin my internet sleuthing for this particular bike, I decided to start there — Googling “Hendrickson’s Bike Shop” .. just to see if they were still in business and if anything interesting popped up.
Hendrickson’s Bike Shop - where this bike’s journey began:
Hendrickson’s Bike Shop was clearly a hub that attracted the local Santa Barbara cycling talent, with links and ties to Olympic and pro cyclists, and other individuals who ended up being influential in the cycling world. Chris King (recognized by some as the best headsets in the world) claims Hendrickson’s Bike Shop as their humble “first headquarters”. John Parker, of YETI mountain bike fame, also has ties to Hendrickson’s Bike Shop. While the shop was prominent back in the day, it does not seem to still be in existance.
Chris King’s first “headquarters”
Hendrickson’s Bike Shop
I’m not sure who owned this bike initially, but at some point in it’s life, it left Santa Barbara, CA and eventually ended up in the hands of John who lived in Eugene, OR.
I started nerding out on serial numbers with this one to get a precise model year.
The initial run of Specialized Expeditions were only produced for four years — 1983 through 1986. From what I can gather, the Expeditions were manufactured by Miyata in Japan. There are a few subtle differences between the model years. At the time, the Miyata plant used an alphanumeric serial numbering system utilizing a letter to indicate the year of manufacture, followed by a build number.
Serial Numbers explained - links:
Asian Serial Number Guide
Miyata Serial Numbers
KXXXXXX = 1982 manufacture year
LXXXXXX = 1983 manufacture year
MXXXXXX = 1984 manufacture year
The previous Expedition that I restored had a serial number of K575134, indicating a manufacture year 1982 - but the bike was a 1983 model year (first year of Expedition availability).
This current “Oregon” Expedition has the serial number L929635 (1983 manuf. date). I initially thought that this should be a 1984 model year based on the serial number and my experience with the previous Expedition. But after a deeper evaluation, I’ve concluded that this bike was manufactured in 1983 and is also a 1983 model year. A short comparison of ’83 vs ’84 model year characteristics:

Specialized Catalogs depicting the Expedition:
1983 (Catalog Link)
1984 (Catalog Link)
1985 (Catalog Link)
1986 (unable to locate scanned catalog)
Just for fun, here’s a link to a 1985 model year Specialized Expedition with some of the attributes depicted: 1985 Specialized Expedition, serial number M238802 (1984 manuf. date) with pump peg braze-on, and “S” on fork crown.
Pasted below are the forum comments about the history of Specialized bike evolution and production from Jim Merz (Copied from this Link)
(In the words of Jim Merz) My comments about these questions:
1) "There are extensive discussions out there online of various iterations of Specialized bikes and their history. When Mike Sinyard initially set out to sell framesets and bikes, he enlisted Tim Neenan of Lighthouse Cycles after having had a custom touring frame built for him."
I met Mike Sinyard when he first started selling parts out of his bicycle trailer in 1974, I was one of his first customers. I became good friends with Mike, and did testing for him, tires for instance. I would go to the Bay area from time to time, and always stopped by to visit Mike. One time, Mike mentioned that he had a bike I should look, and invited me down. It was one of the first batch of Tom Ritchey built "Mountainbikes", I'm not positive on the date, but around 1980. I spent the day riding it, liked it and went back to Portland and built my version of this type of bike. During this period, I was pushing Mike to hire me, he clearly needs someone to be in charge of technical details at Specialized. We talked about this for a while, and then it turned out that he hired Tim Neenan! The excuse was that Tim already lived in the San Jose area, so Mike didn't need to pay for my moving costs! Anyway, I went on building Merz bikes in Portland. Tim did design the first versions of the Sequoia and Allez frames. I don't know the exact details of how much Tim was visiting Japan, but the Stumpjumper bike was certainly closely based on the bike Tom Ritchey built. If it were me, I would have pushed to make a frame more based on my Merz MTB design. The 2nd version Stumpjumper was my design, in fact Mike had me make 3 prototype frames while I was still in Portland that became the 2nd version Stumpjumper. It turned out that Tim Neenan wanted to move to San Louis Obisbo, Mike didn't want anything but total commitment from Tim. So, he called me up and asked when I could take over the job. I said I could start tomorrow. That week I left from PDX and flew to Japan. The start of a 10 year long whirlwind life in the bicycle industry at the highest level.
2) The story I read is that the Expedition was based on that custom frame.
Tim has claimed that he designed the Expedition bicycle. That bike may have been something that he started working on while he was at Specialized, but if so, I designed what became the first production version of the Expedition. It was based on my Merz touring bike frames. When I saw that Tim was claiming this bike was his design, I asked Mike if that was so. He confirmed that I designed it.
3) Neenan also designed the original Sequoia and Allez frames.The earliest of the latter model were built by Yoshi Konno of 3Rensho and are very much sought-after; allegedly a small number of Sequoias were also built by Mr. Konno.
Yoshi didn't supply the first Allez frame, it was Toei. The first Sequoia frame was built at 3Rensho, it has fast back seat stays.
4) Production realities led to contracts with Miyata and other high-quality Japanese makers.
3Rensho built the later top model Allez frames up until about 1987. The Allez SE bikes, which was a lower price point full bicycle, was built by Miyata. The Expedition bike was built by Miyata also. The 2nd version Sequoia frames and bikes were built by Miki.
5) Neenan is also credited with designing the original Stumpjumper. There are some who contend he borrowed heavily from the design of Tom Ritchey, but it IS fair to say he went to Japan and worked out how to mass-produce a mountain bike. This was probably the bike that catapulted the company forward and was their highest profile item.
The 1st Stumpjumper was a bike hit in the market. It's controversial whether Tim, or Mike "designed" very much of the 1st Stumpjumper bike. I would say that the first 2 runs of this bike were not mass produced at all. They were sold as a kit, every part needed to be assembled by the dealer including the wheels IIRC. The other detail, there were not that many of them made. They did sell like hot cakes, so it proved that there was a large market for MTB's. But, Specialized was not some tiny company at that point. Mike was the largest Campagnolo distributor in the world, and the largest bicycle tire company. When I first traveled to Japan and Europe, all the bike companies treated us like gods!
6) Neenan's designs would later be refined and modified by Jim Merz (who is around on this forum as @Portlandjim) and later by Mark DiNucci.
I did not refine Tim's designs. I started with new frame designs based on my ideas. I also came up with all the components that Specialize had made. We never used product that was just stamped with our logo.
7) Frame production shifted to Taiwan at some point in the '80s, and in interviews it has been observed that Specialized personnel personally oversaw some of the processes to sweat the details.
I pushed to move production for some of the lower price point MTB bikes to Taiwan around 1985. At that time, the Yen/Dollar exchage rate was becoming a problem for sourcing bicycles from Japan. I worked with Giant at first. I belive that the Hardrock was our lowest price point model, and they had never made any bike at that high of a price point! I spent a lot of time getting them up to a higher lever. At the time, Schwinn was using them for a low end road bike. But, Schwinn was not helping Giant learn how to make better bikes. This is when I hired Mark DiNucci to work for Specialize, we both worked with Giant to up their game. In fact, their first carbon fiber bike was made for Specialized. Mark and I had a lot to do with that bike, and it was a big success.
8) The 1987-1989 Sirrus uses the same Giant-built-in-Taiwan frameset as the Allez of those years, but with somewhat softer paint and Shimano 105 rather than 600 components. My '88 Sirrus was a revelation - it is absolutely one of the very best riding bikes I have ever had under me, and only the presence in my stable of a Neenan-built Lighthouse with near identical geometry but clearance for larger tires has be considering selling it.
I was not in charge of lower price point bike models during the later time period you mention. If Giant made an Allez, it for sure would not have used the same frame as the Sirrus. In any case, Mark DiNucci took over the frame design duty when I left Specialized aroung 1990 or so.
Specialized contracted with various world class suppliers throughout the years, but has almost always designed the product. And did the best internal testing in the industry. This is a model similar to Nike. Some items were made in the USA, water bottles for example. It doesn't make sense to ship cargo containers filled with water bottles across the ocean. The Epic carbon MTB frames were made in Morgan Hill. Also M2 MTB frames were made in the USA. But, time seems to have confirmed that the best value to the rider comes from sourcing products from the best manufacturers.
Specialized Bicycle sells some of the best bicycles in the world. The company philosophy, which I had a large hand in developing, is still in place. I am very proud of my work there.
These comments are my personal opinon, I try to be accurate but due to old age my brain has faded somewhat!
Jim Merz
———-
Back to the bike -
At some point, John Aeby (or someone else), replaced the original wheelset with a set of Shimano 105 hubs laced to red “aero” rims. In my opinion, this really distracted from the original esthetics of the 1980s touring bike.
I didn't really expect to find an original set of wheels for this bike, as they’re a somewhat unique combination of a 36-spoke front, and 40-spoke rear Super Champion rims laced to Specialized sealed bearing hubs.
However, I did stumble upon a beautiful vintage wheelset built with Suntour XC Pro hubs laced to Mavic Module 4 rims, with a 6-speed, 11-32 cassette, and 700x32 GravelKing tires mounted. I think the wheels look great on this bike. The wheels have a decal indicating they were built by Hector Chavez of Winning Wheels Bike Shop. Google shows the shop in Pacific Grove, CA.


Somewhere in the bike’s life, the rear derailleur was replaced with a Shimano STX derailleur - this is a mediocre mid level component. The original rear derailleur should be a Suntour Mountech. That derailleur is long gone. During my initial evaluation of the bike, my first thought was - “this derailleur has to go.” However, after nearly 100 miles of enjoying this bike, I’m inclined to leave it just as it sits for the time being. While not a sexy or notable rear derailleur, it is functioning surprisingly well. If by chance, I stumble upon a Mountech or perhaps a Shimano M700 rear derailleur I will consider replacing it, but for now - this is working quite well.

In 1983, the Expedition MSRP was $649. In 1984, the MSRP went up to $699. The Expedition was only available in Metallic Slate Grey. They may look a little drab to some, but you learn to love it and appreciate it for what it is. To me, it is the epitome of what a utilitarian touring bike should be.
Like it was Christmas, I unboxed the bike and removed the protective foam and wrapping material. I put the frame into the bike stand and started going over the bike for the first time. Are there any dings or dents? Any sign of abuse? What is salvageable and what needs to go? When you only have pictures to go by, it’s hard to know what will actually arrive. You’re afraid to get your hopes up, as there are numerous potential issues that could be present that would diminish the joy of rehabilitating a vintage bike. Sorting the removed and boxed components, I started piecing the bike back together.


Slowly, I started to realize and conclude that this was a fine example of a 40-year old touring bike. Most of the original components were present and in functional condition. There are abrasions and scrapes here and there. But again, this is a 40-year old bike, and it’s been ridden — as it should, but not abused or neglected - even during the time from 2009 until present, when it sat unused (14 years!). There were no dents in the frame tubing. The original, 40-year old Avocet Touring II saddle was even still on the bike.
I installed the Suntour XC Pro / Mavic wheelset and adjusted the brakes and rear derailleur. John had been using a pair of red Wellgo SPD pedals and I wanted to return the bike to it’s original aesthetics, so I installed a set of nondescript Sakae pedals with toe clips from my parts bin. (According to the catalog, this bike would have originally been equipped with “MKS Silvan Silver” pedals with Specialized toe clips and straps). Google yields the availability of “MKS Sylvan” pedals (slightly different spelling), and it looks like they’re still in production and easily available. In the future, I may try to locate and install the proper pedals.
The bike was beginning to take shape and become part of the family here. I started cleaning the dirt and dust from her. Wiping down the tubes and components. Removing residue. I pulled the cranks to degrease behind the chainrings. It started to sparkle a bit. It was functional enough for a “driveway” test.


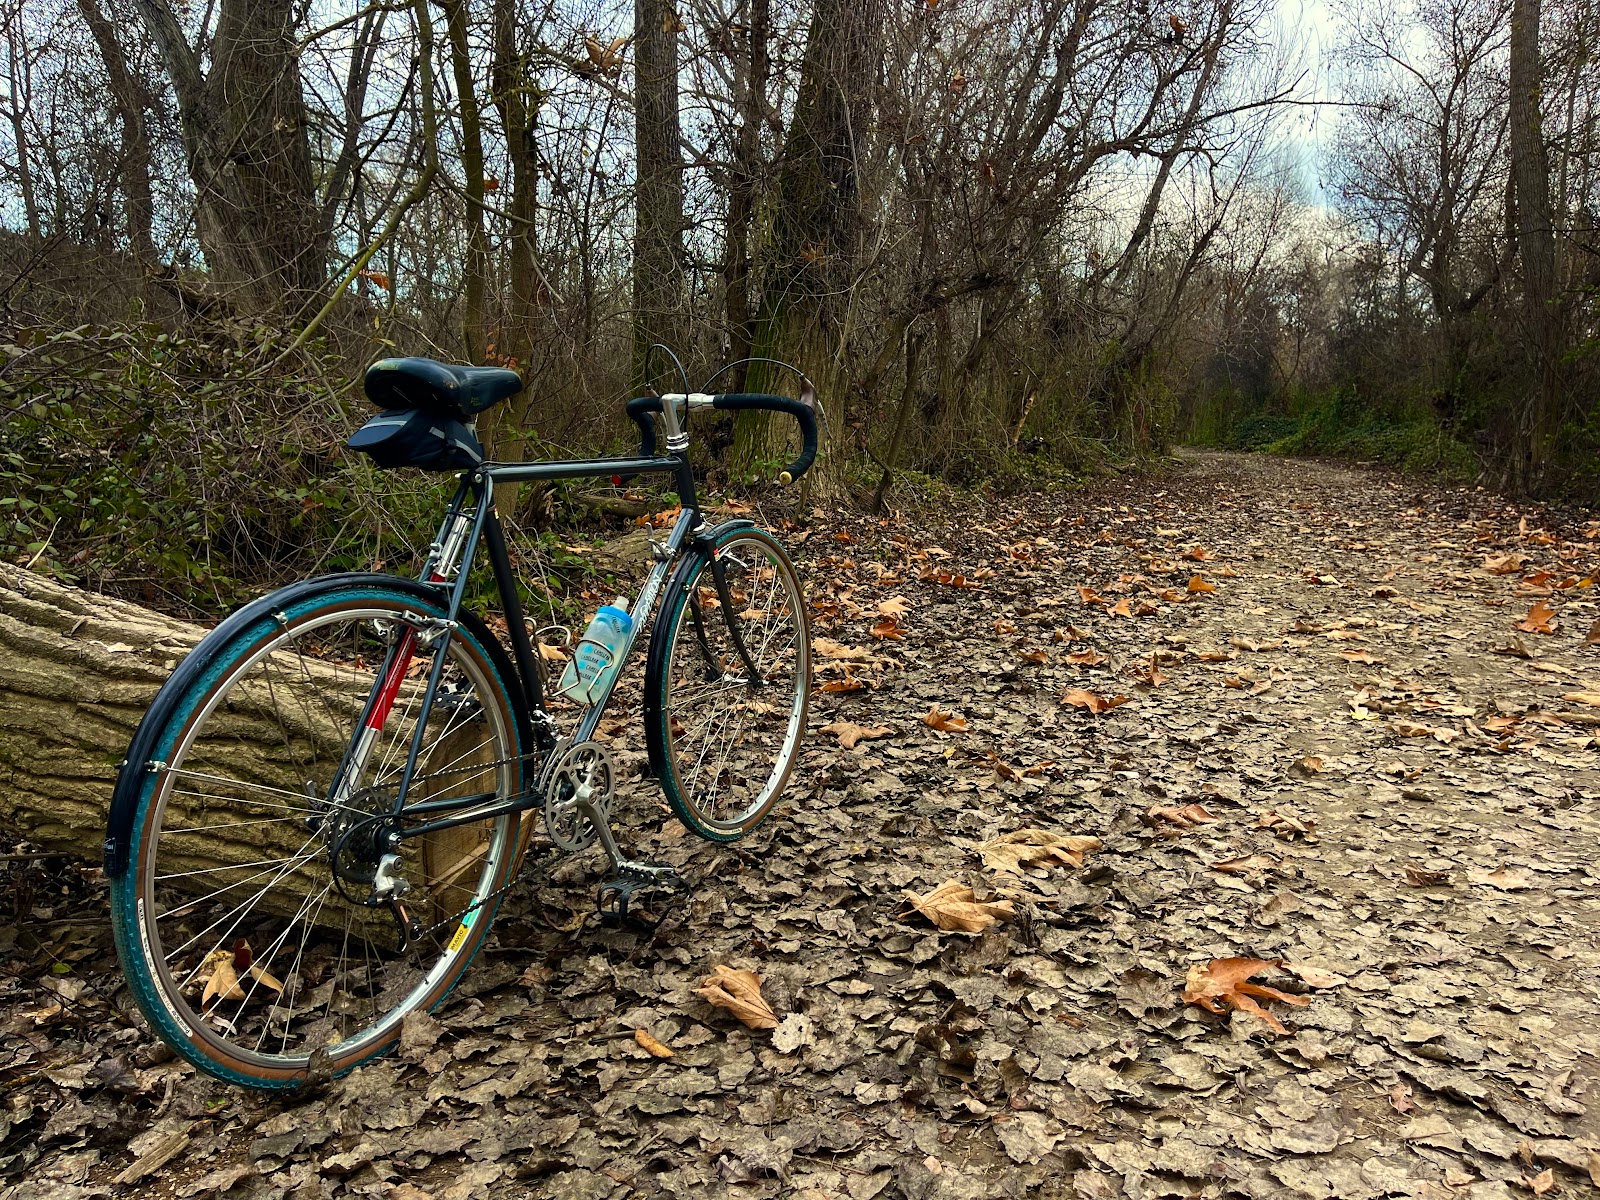
It rolls. It shifts. It brakes. It fits perfect (size 58). Some minor tweaking was in order. Saddle angle. Brake alignment. Soon, the bike was ready for a short journey. I gathered up a small repair kit — allen tools, a spare tube, tire lever, pump, etc. and headed out on the initial “shake down” ride. Just like I remember. This thing sails along like a Cadillac. The 170 mm cranks took a minute to get used to (a little shorter than what would typically be spec'd on a modern bike). And there’s a bit of weight to get moving forward, but once in motion, the bike just rolls along like it’s on auto pilot. So comfortable. Such a joy to ride.

A few additional adjustments and the bike was settling in to the stable - I felt a bond forming. I added a pump peg and installed a Silca frame pump that I had lying around. As the rain started to arrive, I decide to install the Zefal fenders that were included with the bike.
Since getting her together, I’ve hardly ridden any of my other bikes. Winter has arrived here, and I’m enjoying mindless meandering for hours on this bike. 30-40 mile journeys, where I have no idea where I’m going until I get there. It’s sort of freeing just to get on a 40-year old bike and ride for the pure joy of riding. Setting out with no agenda for maxing out my heart rate, or goals for climbing elevation — just riding and taking in the surroundings.

I’m fortunate, that where I live, I can easily and safely get off the beaten path and take in the changing season from the saddle of a bike. There are gravel roads and paths that meander through protected open spaces. This bike is perfect for this sort of riding.



One thoughtful attribute of the Expedition is the internally wired down tube for a bottom bracket based Sanyo generator for powering lights. While I’ve seen several of these Expeditions over the years, I dont recall ever seeing one with the bottom bracket generator option installed. I thought it might be fun to locate and install the optional generator. I was lucky enough to find a shop in southern CA that had a small supply of NOS Sanyo generator / lighting kits. For about $70, I had the kit delivered and after about 20-minutes, I had the lighting kit installed. As you might expect from 40-year old bicycle lighting technology, the output leaves a lot to be desired, but I’m happy to be utilizing the intended purpose of the internally routed wiring.


For now, I plan to enjoy John's bike as it is. It's completely functional and a joy to ride. As opportunities present themselves, I will keep an eye open for the correct pedals and rear derailleur. I'm not super hopefull of ever locating the exact intact wheelset - but that's ok. This set is beautiful and the Suntour hubs are inline with the rest of the Suntour components on the bike.
To the widow and kind lady who reached out to me and trusted me with John's bike - Thank you for the opportunity to be part of this bikes continued journey. After 40 years, this bike is still rolling strong and still being enjoyed. I wonder where it will be in the next 40 years?