
I recently finished the renovation of a 1983 Specialized Expedition (see blog post here) and completed my first two randonneuring events on her. Looking around the field of rando bikes, I became envious of the beautiful oiled canvas and leather handlebar bags that were common. The bags seem very useful for carrying easily accessible extra clothing layers, food, camera etc. on these 200k+ rides. Studying the intricate details of everything involved, I came up with this short list of requirements to pull it off successfully:
Small front rack -- similar to the Nitto M12 or Velo Orange Pass Hunter (these two options would fit my bike outfitted with cantilever brakes) ($80-$100)
Decaleur -- a bag support device that is mounted to the stem/headset and serves to stabilize the load. ($75-$100)
The Bag -- a nice oiled canvas bag with leather trim. For me, something in the 10" x 8" x 8" size would be ideal. ($150-$250)
After researching all the options and scouring forums for information, the list above seemed to be the most common, no-nonsense, accepted combination of gear.
While doing the math, I soon realized I would have nearly the amount of money tied up in getting this bag mounted as I spent on the initial bike purchase. While I'm not opposed to spending a solid dollar on bike gear, I just couldn't help wondering if there was another way to achieve what I wanted.
During a Google search, I stumbled upon the following thread: bikeforums.net
I thought I would give it a go myself. If all else fails, I'll throw down $300 - $400 and get the proper set up. But for now, I'll take a chance of throwing a few bucks at something I might be able to pull off with some degree of success.
I hit the hardware store and grabbed the following:
1/4" x 4' steel rod
3/8" ID vinyl tubing (x 1') (They actually gave me about 16" and I just left the entire piece whole)
1/8" x 3/4" x 3' flat aluminum (cross, support pieces)
1/16" x 1/2" x 3' flat aluminum (for stablizing strut -- only about 8" is needed)
The total cost for the above items was about $14


I measured and marked the center of the steel rod, then measured and marked the center of the clear vinyl tubing. I slid the tubing over the rod and lined up the two marks. Now the vinyl tube was exactly centered on the center of the steel rod. With the center of the rod clearly identified, I began by first bending the rod and making a "U" shape with the center mark at the very bottom of the U. (To make the bends, I slipped a flat mountain bike handlebar over the steel steel rod, directing the end of the handlebar to the point I wanted the rod to bend.)
Using the actual bike as a template, I slid the U shaped rod under the stem, with the two long sections of rod resting over the top of the handlebars and pointing forward. The next step involved bending the legs of the bracket downward. I pushed the rods downward, until they were parallel with the head tube of the frame. The last bend I needed to make was for the shelf, where the bag would eventually rest.
I eyeballed a point on the fork crown, where the fork is drilled for a brake or fender attachment. This is where a support "strut" would be tied to the rack. I wanted the platform or shelf of the rack to be in-line with the support point. I marked a point on each leg of the bracket that was in-line with the mounting point on the fork crown. I bent the rod upward, to roughly 90 degrees from the previous bend to establish the shelf or support arms.

I wanted the bag secured to the rack rather than the handlebar to keep as much of the handlebar free for hand positioning. I used the flat aluminum to build the bag attachment points. I made a 10" piece for the vertical (back) support, and two 6" pieces for the base. Each piece is secured to the rod by a 3.5" backing plate. The strut that attaches to the fork (to limit fore/aft movement) was cut from the 1/16" x 1/2" flat aluminum. (There's a scrap piece of the support shown on the far right that's 3.5" long. If you do your math better, you could end up with no scrap).

The strut, bent with an adjustable wrench and drilled. Proper length determined during test fit.

I cleaned the pieces up with a dremel tool to remove the sharp edges then hit them lightly with 0000 steel wool. Hole drilled in the center of each piece and then assembled using allen head bolts similar to the rest of the stuff on your bike.


I cleaned the pieces up with a dremel tool to remove the sharp edges then hit them lightly with 0000 steel wool. Hole drilled in the center of each piece and then assembled using allen head bolts similar to the rest of the stuff on your bike.


Here it is assembled with about 4" cut from each leg of the "shelf"


I visited the local outdoor sporting goods store that has a small "army surplus" section to find an appropriate canvas bag. They didn't have anything with worn character that would suffice, but they did have canvas tool bags. You can get these on-line for about $15 (Google "Military Tool Bag"). They measure 11" wide, x 7" tall, and 6" deep. As a youngster in the Air Force, I used one of these bags everyday working on F-4E fighter jets -- so I have a bit of nostalgic connection that adds to the enjoyment.

The bag needs a stiffener to give it shape. After a week of searching for free coroplast I gave up. I had never heard of coroplast until I started this project. During my research I discovered that it is fairly common to use, even in the expensive bags. I'm guessing it's short for "corrugated plastic". It's the stuff that election signs are printed on. They also use it a lot for real estate signs showing where the new developments are. I broke down and bought a 36" x 36" sheet at the hardware store for $8 bucks.
The flat aluminum support piece mounted on the vertical part of the rack is 10" long. I drilled two holes 8" apart to attach the bag. I marked the bag at the hole locations and hit them with a punch and hammer to make a hole in the canvas.
Checking fit, here it is with the back support attached to the bag (still no coroplast stiffener installed).

I found these "T" nuts at the hardware store. Looked like they would be good for biting into the coroplast and securing the bag to the rack.

Now, for the coroplast
Measured....


Cut....


Folded into a box shape


And installed in the bag


And finally....mounted to the rack


There are a few more finishing touches that can be done -- such as adding Velcro to secure the bottom of the bag to the shelf (done). I also have an idea for the handles on the bag. I was going to cut them off. But my new idea is to cut them in the center and then add Velcro. They can serve as Velcro straps across the top of the bag for securing items to the exterior of the bag. So, it's not quite finished, but it's pretty well functional as-is.
Here it is after it's first test ride -- a 200k brevet with the Santa Cruz Randonneurs. Santa Cruz to Gonzales CA and back 200k. No problems.

If you made it this far, thanks for reading.
Edit (3-5-16):
Two "updates" I've been planning for the bag; first -- converting the tool bag handles into a Velcro strap for securing things to the top / exterior, second -- waterproofing the exterior of the bag.
First -- the Velcro straps:
The bag has two handle straps that are attached front to rear of the tool bag. I found the center of the strap and cut it with the sturdy scissors.

Now, I have four straps -- two on the front of the bag, and two on the rear. I want the straps to go across the top of the opening when it's done, so I've paired the straps and attached Velcro like so:
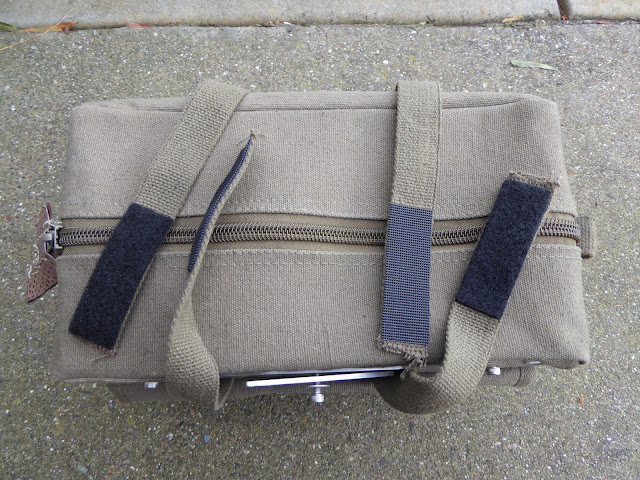
This is how I want the bag and straps to function when complete:

Here's my sewing kit I had around from a previous project, and the Velcro I bought from the big box hardware store. This worked really well.

Second update -- waterproofing.
I found this Instructable while searching the web for "diy waterproof canvas." It calls for
blending wax (preferably bees wax) with linseed oil. The author indicates the toilet ring is a good source for bees wax. Maybe a hundred years ago, but not anymore. I was in a hurry (impatient) and was having trouble easily locating a local source for bees wax, so I went ahead with the toilet bowl ring.
Here I am melting the wax toilet bowl ring.
PRO TIP: Don't do this while the wife is home, and don't ever mention it.

I was afraid to add the linseed oil to wax inside the house with the goo on the stove. So, I heated the wax and moved it to the garage to add the linseed oil. Not ideal, but...
Here's the finished product, waxy mess applied, dried (mostly), and reassembled:


Subscribe to:
Post Comments (Atom)
I really love this Idea. You’ve certainly done a neat job on this one. And it seems quite easy to do! The flat aluminum pieces has been very useful for this project – it is actually a good choice for it. Anyway, thanks for sharing this post with us, Joe. Have a great day!
ReplyDeleteBernice Parsons @ Badgeranodising
Thank you for the nice comment Bernice! Glad you appreciate it. Joe
DeleteWow, this is very cool! I bet a lot of people out there would love this kind of accessory on their bikes. It’s amazing how you can use those aluminum pieces to create this project. Anyway, are you still using it? I hope it has served you well. Thanks for sharing.
ReplyDeleteRosemary Bailey @ Wabi Iron & Steel Corp.
Thank you. And yes, still working well.
DeleteThat handlebar bag would come as great alternative for big backpacks that are usually used to store food, gadgets, and such. It would come as a great storage solution for biking enthusiasts like you who carry a lot of stuff on the road. Also, the fact that you used aluminum as the base makes it quite sturdy. Thanks for sharing this DIY with us, Joe. Have a great day!
ReplyDeleteBrandi Bradley @ Rotax Metals
Howdy! I stumbled onto this post looking up Nitto F16, but the angles and price don't work for me, but I think I'm gonna give this project a go. I plan to use a small wire basket abd North St. Bags duffle. Thanks for the inspiration.
ReplyDeleteHow did it turnout Richard?
ReplyDeleteThanks for the write-up. Very helpful. Santa Cruz is a great area for cycling!
ReplyDeleteSuper instructive and well put together. Big thanks and respect!
ReplyDelete-Risto
Love this and will try to fit one to my new Jones Bar handlebars.
ReplyDeletehave you had any issues with lateral movement? i am a bit nervous that the only thing keeping the rack from swaying is a single bolt in the center of the cross bars. also, this design seems to put tom of torque on the bolt attaching the rack to the bike.
ReplyDeleteNot at all. Nearly all of the weight is supported by the metal rod material braced and balanced between both sides of the handle bar and the stem. The attachment to the fork is to prevent the fore/aft movement which is extremely minimal. The design has been working really well.
DeleteExcellent job presented in a precise manner. Wrenching on F4's agreed very well with you!
ReplyDeletethank you for sharing this!
ReplyDeleteVery cool and well thought out!!
ReplyDelete